Preparations
This is a description on installing Microsoft Team Foundation Serverv (TFS) 2017 or 2018 on a single server. I am doing it on a virtual machine running Microsoft Windows Server 2016 in vmware Workstation version 14.Microsoft has provided the document "Install TFS on a single server" (TFS single server) and this document describes several activities and hints quite nicely. I am quite new to TFS and similar platforms which gives me some experiences that are not described in the Microsoft document. This is the motivation to this text and the works behind.
There is a document from Microsoft on "Install and configure Team Foundation Server". But for now this document is on TFS 2015 and not TFS 2018.
Microsoft SQL Server
The Microsoft document on TFS single server installation describes a TFS installation using Microsoft SQL Server Express as database platform. But this solution is rather limited with SQL Server Express and then I have decided to use a "real" Microsoft SQL Server installation in this scenario.Besides SQL Server Database Engine - with Full-Text Search - the SQL Server installation also includes SQL Server Analysis Services (SSAS) with a Multidimensional database model, SQL Server Reporting Services (SSRS) in a Native setup and SQL Server Client Connectivity Tools.
If you are using SQL Server 2017 then Reporting Services is a separate download and installation. But you will need the product key for the installation.
The trick is
- Install SQL Server Database Engine first. During installation copy the product key. You can put it in a text-file for future reference. Do not patch yet to required CU level.
- Install SQL Server Reporting Services with the product key from the general SQL Server installation. During installation you are required to restart the server. Do that and configure Reporting Services with the Report Server Configuration Manager. You can name the Reporting Services the same way as the databases you plan for TFS, e.g. "Tfs_SQLAdmin_*".
- Patch the SQL Server platform with the lastest approved Cumulative Update (CU). The CU installation set will also patch Reporting Services.
To make TFS backup and restore work a network path to a share is required. This requirement is to (try to) ensure that the backup files are placed on another machine than TFS.
To make the TFS backup and restore work on a stand-alone sandbox server like this a local share can be created.
DO NOT DO THIS IN PRODUCTION!!!
If you want the database files placed in another path than the default location you should change the database default locations on the SQL Server Database Engine instance.
You might run into some difficulties if you create the path in your own context. To get the ownership of the folders correct you can use the (undocumented) extended stored procedure
master.sys.xp_create_subdir. I would not recommend to enable xp_cmdshell as described in some "solutions".Or you could move de databases right after completion of TFS installation. Still you should do it through SQL Server with xp's.
Disclaimer: I have worked with SQL Server as my primary field for 10+ years, so this description might be too thin to some. If you can't find what you need in this text or the documentation from Microsoft on installing SQL Server then please write a comment to this text.
Oracle JRE
TFS is using the 3rd part product Elasticsearch for Code Search, and Elasticsearch requires a local Java runtime installation. The documentation from Microsoft specifies the requirement to be Oracle Java Runtime Engine (JRE) 8 update 20 or later. I usually prefer the latest version and on this day it is JRE 8 update 172.Get the Server JRE from Oracle Java downloads (link). You might have to scroll a few screens down to find Java 8.
Unlike other Java installations it is packed several times into a tar.gz-file. This is how I unpacked the installation using 7-zip before putting it on the server:
- Unpack the tar-gz-file to the same folder.
- Unpack the tar-file to a subfolder, e.g. "\server-jre-8u172-windows-x64\".
- The subfolder then holds only one element with a JDK subfolder, e.g. "\jdk1.8.0_172\"
- Copy this folder to the server in the path you see fit, E.g. %ProgramFiles%\Java.
After installing JRE the Windows environmental variable JAVA_HOME is required by Elasticsearch.
Set the value of the variable to the full path to the JRE folder:

Please notice that the full path to the JRE installation on the given update level.
Service accounts
The SQL Server components are installed with local virtual accounts as service accounts. If the installation is in a Active Directory (AD) domain then I would consider using AD Managed Service Accounts (MSA) for SQL Server components.For the TFS components these service accounts are created locally:
- TFS Service (tfsservice); Log on as a service
- TFS Reports (tfsreports)
- TFS Build (tfsbuild); Log on as a service
- TFS Search (tfssearch); Log on as a service
- Open "Administrative Tools".
- Expand "Local Policies" (secpol.msc).
- Click "User Rights Assignment".
- Right-click "Log on as a service" in the right pane and select Properties.
- Click "Add User or Group...".
- Enter user to add and click OK.
- Click OK.
- Close "Local Security Policy".
When preparing for a TFS installation in Production I would definitely ensure that the service accounts are hardened and secured. Generally I think that source code and development documentation is core business information and must be secured as much as possible.
Installation
The installation set can be downloaded as either EXE- or ISO-file. I prefer the ISO-file as I like the way it can be mounted the virtual server and used without much ado.TFS installation
The installation is started with the Tfs exe-file in the root of the installation set, e.g. "Tfs2018.exe". In the first screen the installation path can be entered, which I think should be considered if your server standard aim to protect the system drive by seperation of system and applications.
The basic TFS installation takes several minutes:

When the basic TFS installation is completed the machine must be restarted.

After the restart the TFS installation automatic start the TFS Configuration Wizard:

As this is a isolated sandbox installation I choose to participate in the Microsoft Improvements Program:

This is a new TFS installation and I don't have databases or any other configuration items on TFS:

With TFS 2018 Update 3 you are asked if the installation is a trial. The default answer is a trial installation. If you have Visual Studio or MSDN subscription I recommend not to install as trial. One thing is that the trial installation will expire after 60 days:

At first it would seem obvious to do a basic deployment of TFS, but as I would like integration with SSRS I have to select a Advanced TFS deployment:

The TFS language selection is English. While I am in a very little language area with Danish I generally prefer servers to "speak" English. This remove a lot of communication issues - also with consultants not speaking Danish:

The SQL Server Database Engine is here installed with a named instanced. I have not created empty and pre-sized databases. This I will get back to later:

The default service account for the TFS service is Local Service, but as mentioned earlier I have created dedicated service accounts. Please notice the possibility to test the service account:

The TFS Application Tier is configured with defaults:

The TFS Search is also configured with a dedicated service account and not the default Local Service. As this installation is a single server installation there is no existing Search Service. When installing TFS in Production a separate TFS Search server i highly recommended:

With Update 3 for TFS 2018 Microsoft has introduced basic authentication to secure the communication with TFS Code Search. There is a note on the Microsoft DevOps blog "Introducing Search service authorization to make communications with TFS more secure" with some background and a upgrade path.
This is where the integration with SSRS is indicated:

When the SSRS installation is configured and running before TFS installation the TFS Configuration Wizard can detect not only the SSRS instance but also the SSRS URLs:

The TFS Reporting also uses SSAS, and when the SSAS installation is configured and running before TFS installation then the TFS Configuration Wizard can detect the SSAS instance:

To segregate the TFS Reporting from the rest of the TFS installation it is highly recommended to use a dedicated service account for TFS Reporting:

I do not go with the default TFS project collection as this will give some nasty restrictions on future consolidations:

When then TFS configuration definition is completed then the wizard gives you the possibility to manually review the complete TFS configuration:

Finally the TFS Configuration Wizard verify the complete configuration. It is at this point things like SSAS database model is verified. The verification takes several minutes:

When the verification is complete you get a picture like this. I had to do some reruns of the verification before getting it right:

Then it is time for the actual configuration of the TFS installation. This will take some minutes:

Again you will get a nice status picture when the TFS configuration is complete:

Finally the TFS Configuration Wizard shows link for log file, link to TFS and other useful configuration details.
The TFS site is running on Microsoft Internet Information Server (IIS) in a dedicated application pool. The default application pool is also running, but in a Production installation I would really consider to stop the default application pool to comply with the Principle of Least Service:

And the scrolling text is something I think should be in the general documentation:

When the TFS Configuration Wizard is closed the installation automatically start the TFS Administration Console:

Configurations
After the TFS installation I pinned some tools to the Windows Start:
Also I created these shortcuts on the Windows Desktop:
- Report Server (http://localhost/reportserver)
- Reports (http://localhost/reports)
- TFS (http://localhost:8080/tfs)
- TFS Logs Folder (C:\ProgramData\Microsoft\Team Foundation\Server Configuration\Logs)
TFS Scheduled Backup
Even in a TFS sandbox a backup should be scheduled. See more below in the section about Database Configuration.
The TFS Scheduled Backups Wizard require a Network Backup Path that must be a UNC-path. Please see the section in the beginning of this text about SQL Server preparations.
A simple TFS backup schedule could look like this:
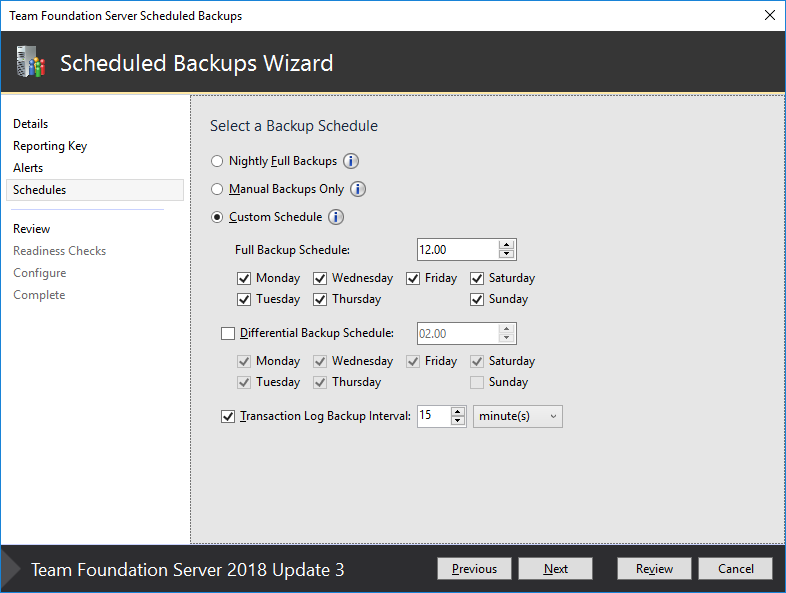
Please notice that this is a TFS backup schedule for a sandbox installation. In Production or another more important environment I would really consider to change the retention to a higher value.
Database Configuration
The TFS Configuration Wizard is running in the user context of the administrator who started the TFS installation. This gives that the user is owner of the databases. Such a configuration should be changed to your standard as it otherwise could generate problems when the user is disabled or deleted in the AD domain:

The database recovery model on the created TFS databases is Full - even if the model database is configured for Recovery Model Simple before TFS installation. Usually I would change the database Recovery Model to Simple in non-Production installations, but scheduling TFS database backup in the TFS Administration Console will change the Recovery Model to full on all databases, also ReportingServicesTempDB. And actually this makes sense as TFS use marked transactions on the backup to ensure consistency acress the databases.
Actually the change of Recovery Model is done when the Backup Schedule is configured and in the context of the user working in TFS Administration Console. The backup itself is taken in the context of the TFS service account (tfsservice). Please remember that the backup files are created in the context of the Database instance service account, and that this user must have create and write access to the shared storage on the backup share.
Actually the change of Recovery Model is done when the Backup Schedule is configured and in the context of the user working in TFS Administration Console. The backup itself is taken in the context of the TFS service account (tfsservice). Please remember that the backup files are created in the context of the Database instance service account, and that this user must have create and write access to the shared storage on the backup share.
If the TFS databases are created on SQL Server 2017 then the Compability Level of the TFS databases will not match the Compability Level of the Database Engine instance. To fix this the Compability Level of the TFS databases should be raised from 130 to 140. The TFS installation will still be supported as SQL Server 2017 is on the list of requirements for TFS 2018.
The initial size of the databases is defined by the size of the system database model. During the TFS installation the databases grows several times. The databases should be re-sized with additional space to minimize autogrow events. When installation TFS in Production I would really go with empty predefined databases to avoid database autogrows:

Also I would reconfigure the database autogrow size - especially the TFS Collection database that is initially defined with exponentially growth:

To optimise performance on the TFS Collection database I added some datafiles to optimise for parallel I/O:
ALTER DATABASE [Tfs_SQLADMIN_Collection] ADD FILE ( NAME = N'Tfs_SQLADMIN_Collection_01', FILENAME = N'C:\MSSQL\Data\Tfs_SQLADMIN_Collection_01.ndf' , SIZE = 64MB , FILEGROWTH = 64MB ) TO FILEGROUP [PRIMARY];ALTER DATABASE [Tfs_SQLADMIN_Collection] ADD FILE ( NAME = N'Tfs_SQLADMIN_Collection_02', FILENAME = N'C:\MSSQL\Data\Tfs_SQLADMIN_Collection_02.ndf' , SIZE = 64MB , FILEGROWTH = 64MB ) TO FILEGROUP [PRIMARY];ALTER DATABASE [Tfs_SQLADMIN_Collection] ADD FILE ( NAME = N'Tfs_SQLADMIN_Collection_03', FILENAME = N'C:\MSSQL\Data\Tfs_SQLADMIN_Collection_03.ndf' , SIZE = 64MB , FILEGROWTH = 64MB ) TO FILEGROUP [PRIMARY];ALTER DATABASE [Tfs_SQLADMIN_Collection] ADD FILE ( NAME = N'Tfs_SQLADMIN_Collection_04', FILENAME = N'C:\MSSQL\Data\Tfs_SQLADMIN_Collection_04.ndf' , SIZE = 64MB , FILEGROWTH = 64MB ) TO FILEGROUP [PRIMARY];ALTER DATABASE [Tfs_SQLADMIN_Collection] ADD FILE ( NAME = N'Tfs_SQLADMIN_Collection_05', FILENAME = N'C:\MSSQL\Data\Tfs_SQLADMIN_Collection_05.ndf' , SIZE = 64MB , FILEGROWTH = 64MB ) TO FILEGROUP [PRIMARY];ALTER DATABASE [Tfs_SQLADMIN_Collection] ADD FILE ( NAME = N'Tfs_SQLADMIN_Collection_06', FILENAME = N'C:\MSSQL\Data\Tfs_SQLADMIN_Collection_06.ndf' , SIZE = 64MB , FILEGROWTH = 64MB ) TO FILEGROUP [PRIMARY];ALTER DATABASE [Tfs_SQLADMIN_Collection] ADD FILE ( NAME = N'Tfs_SQLADMIN_Collection_07', FILENAME = N'C:\MSSQL\Data\Tfs_SQLADMIN_Collection_07.ndf' , SIZE = 64MB , FILEGROWTH = 64MB ) TO FILEGROUP [PRIMARY];Discussion
Continuity
When installing a more permanent TFS installation you must plan and test full or partly recovery of the TFS installation. There is a possibility to configure Scheduled Backups in TFS Administration Console:

If you choose to go with this possibility you should not reduce the recovery tests.
Security
The default authentication on TFS is NTLM, but it is according to the documentation possible to use Kerberos authentication. This I would like to look into before building a TFS installation in Production.
History
2018-09-19 Moved to SQLAdmin blog.
2018-02-13 First published on AzureAdmin blog.

